Have yourself a DIY Christmas!
 Christmas gifts have become a holiday tradition that we look forward to. However, getting cost effective, suitable gifts for your family and friends is not an easy task. If you’re stuck for ideas and cash, check out our Do It Yourself (DIY) Christmas gift ideas.
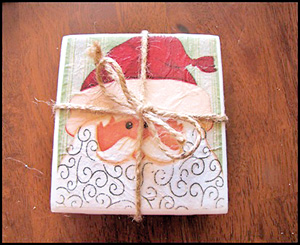
Ho Ho Ho! Merry Coaster-mas
Gift- Set of handmade coasters.
Source- http://www.allfreeholidaycrafts.com/Christmas-Gifts-to-Make/Handmade-Coasters-for-Christmas
Things needed-
set of 4 in. x 4 in. white ceramic tiles
set of Christmas themed napkins/ serviettes
binder gum like Chemifix
thin cork board
acrylic sealer
all-purpose glue gun/ glue stick like Multibond
sponge brush
(These products can all be purchased at any supermarket, bookshop or crafts store.)
Instructions- Cover the tile with a thin, even layer of the binder gum.
Cut the napkin as desired. Make sure that the cutting is a few centimetres smaller than the tile.
Lay the cut napkin on top of the tile and smoothen it out to remove creases.
Let it dry for a bit and then apply another coat of binder gum on top of the napkin.
Leave to dry.
Cut the cork board into square pieces that are a few centimetres smaller than the tile.
Glue the cord board pieces to the back of the tiles using the glue gun/glue stick.
Spray the tops of the tiles with acrylic sealer in a well-ventilated area and let dry. (The sealer allows your tiles to get wet without ruining them.)
Tie them up with jute string or a bow and they are ready to give away!
…………………..
 Holding Your Christmas Wishes Gift- A Christmas card holder
Source- Craft and needlework expert Daisy Vittachi.
Things needed-
6 in. x 24 in. block of hardboard of 500gsm
6 in. x 24 in. piece of padding
8 in. x 26 in. fabric with a Christmas themed print
lengths of 12mm ribbon (Enough to wrap around the holder and to form a loop for hanging the card holder.)
6 in. x 24 in. Christmas wrapping paper
a binder gum like Chemifix
Instructions-
Paste the piece of padding on one side of the hardboard using the all-purpose gum.
Cover the padded side of the hardboard with the Christmas print fabric so that there is a 1 in. seam jutting out from around the padded hardboard.
Fold the seam inwards and paste to the back of the hardboard.
Wrap the ribbon tightly around the covered hardboard. (The ribbon holds the cards in place.)
Cut out 10 in. of ribbon and attach it to the top of the uncovered side to form a loop.
Cover the bare side of the hardboard with the Christmas wrapping paper.
Present it to someone you love.
…………………..
Reindeer Refreshment
Gift- Reindeer drink bottles.
Source- http://lifeofamodernmom.blogspot.com/2010/11/reindeer-rootbeer-beer.html
Things needed-
bottle(s) of beverage (Preferably a stack of six)
pairs of googly eyes (Can be purchased at multi stores and craft shops.)
red pom-poms/ red buttons
30 cm copper wire strands/ coir brush strands (Made by unravelling wire meshed coir brushes used for cleaning.)
multi-purpose glue stick/glue gun like Multibond
Instructions-
Wrap the copper wire or coir brush strand around the mouth of the bottle so that the two ends stick out.
Bend the two ends upwards to form the reindeer’s antlers.
Glue a pair of googly eyes onto one side of the bottle neck.
On the same side, glue the red pom pom or red button below the googly eyes to form the reindeer’s red nose.
Gift with love.
A Patchwork of Christmas Gift- Patchwork cushion cover
Source- Daisy Vittachi
Things needed-
12 ½ in. x 12 ½ in. piece of interface (Can be bought at any craft shop.)
six 1 ½ in. strips of fabric (To form the foliage of the Christmas tree.)
two 2 ½ in. strips of fabric (To form the bark of the Christmas tree.)
16 ½ in. x 16 ½ in. piece of padding (can be bought at any craft shop.)
16 in. x 16 in. piece of fabric lining
two 16 ½ in. x 9 in. pieces of fabric (To form the back of the cushion cover.)
Note-
The fabric needed amounts to about ½ a yard (36 in. x18 in. piece of fabric)
Choose a colour scheme you like.
The photograph of a completed patchwork cushion cover can be used for a model colour scheme.
It is advisable to purchase cut pieces measuring the lengths mentioned above.
Instructions-
Draw a Christmas tree pattern onto the interface.
One by one, machine stitch the 1 ½ in. strips onto the interface from bottom of the drawing to the top.
Then machine stitch the 2 ½ in. strips onto the interfacing to form the bark of the Christmas tree.
Cut the remaining square of fabric into equal triangles.
Stitch the triangles onto the two sides of the interface to complete the front of the cushion cover.
Quilt the front.
Quilting in 2 simple steps (You may machine or hand stitch.)-
Place the front of the cushion cover onto the piece of padding and stitch it on all sides.
Then place the padded material onto the piece of fabric lining and stitch on all sides as before.
Hem one inch on a 9 in. side of each fabric piece that is to be used as the backing.
Place the two fabric pieces one on top of the other, on the back of the cushion front. This should be done in such a way that the two hems overlap in the middle to form the mouth of the cushion.
Stitch it together around the square to form the patchwork cushion cover.
It is ready to be gifted.
…………………..
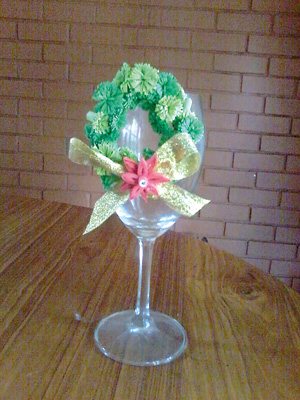
 Joy in a Wine
Glass Gift- Table ornament
Source- Craft expert and columnist for the Tharuni magazine Nilusha Nimanthi Pathirage.
Things needed-
a wine glass
a cardboard circle with its centre cut and removed to form a cardboard ring.
2 A4 sheets of two shades of green
½ in. width gold ribbon paper ½ a yard in length
a plastic Poinsettia flower (Can be purchased from craft stores and multi stores.)
a bottle of binder gum like Chemifix
Instructions-
Form a bow using the gold ribbon.
Paste the gold bow on the bottom of the cardboard ring.
On top of the gold bow paste the Poinsettia flower so that it centres with the bow.
Create bits of grass using the 2 A4 sheets. (You must have enough to cover the surface of the cardboard.)
How to make the grass?
Cut the A4 into ½ in. width strips.
Bend the strip in half.
Slice one half to form short ruffles.
Roll the strips and use glue to hold it together.
Cover the remaining surface of the cardboard ring with the bits of grass.
Paste the decorated cardboard ring under the rim of the wine glass’s mouth.
Gift, to spread the Christmas joy.
…………………..
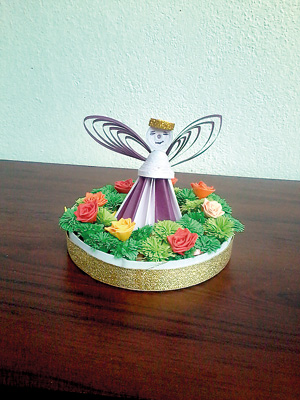
Snow-White Paper Angel
Gift- Table Ornament.
Source- Nilusha Nimanthi Pathirage.
Things needed-
a circular cardboard lid
2 A4 sheets of two different colours for the angel
2 A4 sheets of two green shades for the grass
Small plastic flowers (Can be purchased at any craft shop or multi store.)
A gold cord (Enough to cover the sides of the cardboard lid.)
A bottle of binder gum like Chemifix
Tooth pick
Pen knife
Instructions-
Paste the gold cord along the side of the cardboard lid.
Split the blunt end of the tooth pick to a depth of about 1 cm.
Cut five strips of 12 in. length and 1/8 in. width from the A4 sheets.
Paste them to each other to form a long strip.
Form the torso of the angel using the Fight Coiling Technique
Fight Coiling for Dummies
Insert one end of the long strip into the split of the tooth pick and roll it around the tooth pick.
Paste the remaining end of the strip for it to hold form and then pull the tooth pick out.
To form the torso of the angel, push the roll upwards from the centre by slightly pressurizing it with your index finger.
Paste 6 strips of 2 in. length and 1 ½ in. width to each other, length wise.
Fold the connected strips to form a fan and glue the blunt end of the paper fan to the torso made.
Make a Fight Coil face for the angel and draw the eyes, nose and mouth.
Glue the face of the angel onto the torso.
Fight coil the 1 in. long gold cord to form the angel’s halo and glue it to the top of the head.
Paste the angel onto the inside centre of the cardboard lid.
Cover the remaining surface with bits of grass. (See the previous design for instructions on making the paper grass.)
Paste the plastic flowers on the grass to create a picture of a garden.
The angel is ready to be someone’s Christmas gift.


